File menu
File | New (Ctrl+N) - the command opens the New window wizard.
File | Open (Ctrl+O) - the command allows you to open a binary Advanced USB Port Monitor log file created for some device earlier. The Monitor window will be created for this device. However, if the device is not connected at the moment, it will be impossible to continue logging to this log file.
File | Save (Ctrl+S) - this menu item becomes available only if the Monitor window is active at the moment and allows you to specify a new name for the binary log file. You will be offered to enter the file name in a separate dialog box. If another log file was open before that, you will be offered to copy its contents to the new file.
File | Save as - this menu item becomes available only if the Monitoring window is active at the moment and allows you to save part of data (you should select several data packets in the Monitoring window) or all data in the Monitor window to a binary log file or to an XML file. Before the data is saved, you will have to specify the type of the file and its name in a separate dialog box.
File | Close - this menu item becomes available only if some window is currently active in the program and allows you to close the active window.
File | Close all - this menu item becomes available only if there are any open windows in the program and allows you to close all open windows with one mouse click.
File | Open a workspace - the command opens the dialog box with the list of workspaces. You can find more details about this and other commands concerning workspaces in the Workspace section.
File | Save the workspace - the command becomes available only if some workspace is loaded and allows you to save all changes made in the workspace.
File | Save the workspace as - the command allows you to save the workspace under a new name.
File | Delete workspaces - the command opens the dialog box with the list of workspaces that you can delete.
File | Open a workspace from a file - the command opens the dialog box where you can select any file with a workspace on the disk.
File | Save the workspace to a file - the command opens the dialog box where you can specify the path and the name of the file to save the workspace to on the disk.
File | Open the last workspace on startup - this option specifies that next time the program is started, the last active workspace should be loaded. If no workspace has been used yet, the option is ignored when the program is started.
File | Print - this menu item becomes active only if the Information window is currently active (information about a device, about URB, etc.) and prints the contents of this window with the current print settings.
File | Print setup - the command opens the standard Print Settings dialog box. Further on, these parameters will be used when the Print command is selected.
File | Exit - the command allows you to exit the program. The position of the main program window will be saved when you exit the program.
|
Note: If a workspace was opened, no changes made in it will be saved. |
Edit menu
Edit | Copy (Ctrl+C) - this menu item becomes available only if the Monitor window is currently active and one or several data packets are selected there. The command copies the selected items to the clipboard.
Edit | Select all (Ctrl+A) - this menu item becomes available only if the Monitor window is currently active and there is al least one data packet in it. The command selects all data packets. After that you can either copy these data packets to the clipboard or save them to a file.
Edit | Find (Ctrl+F) - this menu item becomes available only if the Monitor window is currently active and allows you to search for text in the window. After you select this command, you will see a dialog box (fig.1) where you can specify search parameters.
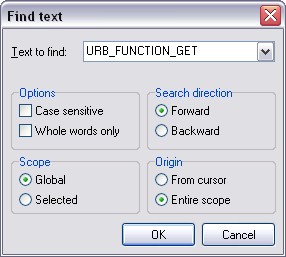
Fig.1 Search parameters dialog box
Text to find - the text that is to be found;
Options - here you specify the parameters of the search string
•Case sensitive - take into account the difference between lowercase and uppercase letters while searching;
•Whole words only - search for whole words only. If this option is disabled, the text will be searched for inside long words as well.
Direction - the direction of searching for the text
•Forward - search from the current position to the end of the file;
•Backward - search from the current position to the beginning of the file.
Scope - the scope of data to be searched is specified here
•Global - search all data packets for the text (starting from the start position);
•Selected - search only selected data packets for the text.
Origin - the start position is specified here
•From cursor - search from the cursor position;
•Entire scope - search all data in the window.
After you click the OK button, the program will try to find the specified text. If it finds the text, the focus in the Monitor window will be moved to the found data packet and the found text will be highlighted in the color specified in the Program options. To find the next match, you should press F3. If no text has been found, the corresponding message will be displayed.
Edit | Find next (F3) - search further with the same parameters.
|
Note: The Copy, Find, Find next commands work only with text that you see on the screen. If the current data view does not display any text, the specified operations will not be performed with it.
|
Edit | Properties - the command open Program options dialog box.
View menu
View | Show connected devices only - this option enables/disabled displaying only connected devices in the USB devices window. It means that if this option is enabled, USB ports without any devices connected to them will not be displayed in the USB devices window.
View | Hide host controllers without devices - this option becomes available only if the previous option is disabled and enables/disables displaying host controllers without any devices connected to them in the USB devices window. It means that if this option is enabled, host controllers without any devices connected to them will not be displayed in the USB devices window.
View | Auto refresh the USB devices tree - this option enables/disables automatically refreshing the list of devices in the USB devices window when you connect or disconnect USB devices. If the option is enabled, the list will be refreshed in a few seconds after a USB device is connected and completely initialized and ready. If this option is disabled, you will have to click the "Refresh" button in the USB devices window.
View | Auto scroll - this option enables/disables automatically scrolling the Monitor window when new data is received. When the option is enabled, the focus in the Monitor window will be automatically moved to the new data packet as soon as it is added to the Monitoring window. If the option is disabled, the focus in the Monitor window will remain unchanged.
|
Note: This option consumes a lot of processor resources because data packets are decoded and displayed on the screen and the position of the scrollbar is calculated when scrolling is on. It is recommended to disable this option if the data flow is heavy.
|
View | Toolbars - this submenu allows you to enable/disable additional toolbars in the main window of the program.
View | Toolbars | Taskbar - the command enables/disables the taskbar in the main window of the program.
View | Toolbars | Status bar - the command enables/disables the status bar in the main window of the program.
Tools menu
Tools | Open the monitor window - the command opens the Monitor window with the default parameters.
Tools | Open the waiting monitor window - the command opens the Monitor window that will be waiting for a new device to be connected. AS soon as the device is connected, the program will automatically start capturing data from this device.
Tools | Open the performance monitor window - the command opens the Performance monitor window with the default parameters.
Tools | Show details - the command opens the USB device details window.
Tools | Replug the device fast - the program reinitializes the device on the software level, which is the same as safe disconnection it from the computer and then connection to it again. You may need it if you want to capture data that the computer and the device exchange when the USB device is being initialized or if you have changed the filter driver of Advanced USB Port Monitor for some reason.
|
Note: In some cases it is impossible to do this and you will see the corresponding message. In this case, it is recommended to unplug the device from the USB port, wait a few seconds and plug it into the same USB port.
|
Tools | Save as a Microsoft Word document - this menu item becomes available only if some information window is currently active (USB device details, information about URB, etc.) and allows you to save the report in the Microsoft Word document format. If you select this item, you will see a dialog box where you will have to specify the file name.
Tools | Save as a PDF file - this menu item becomes available only if some information window is currently active (USB device details, information about URB, etc.) and allows you to save the report in the Adobe PDF format. If you select this item, you will see a dialog box where you will have to specify the file name.
Tools | Export to an XML - this menu item becomes available only if the Monitor window is currently active and allows you to export data from the Monitor window to an XML file. This command is similar to the File | Save command except that you can save data only to an XML file.
Advanced features - commands for working with the driver allow you to specify driver configuration parameters. You may need it when you want to remove the driver from the system, reinstall it in the system or disable it for some device.
|
Note: You should be careful with the driver control commands because an uninstalled or incorrectly installed driver disables 90% of program features.
|
Tools | Install the driver service - the command installs the driver onto your system. Everything necessary for the normal functioning of the driver as a filter driver is done.
Tools | Remove the driver service - the command removes installation information about the driver from your system. This command does not remove information about installed filter drivers. That is why it may result in your USB device not working. Before you select this command, it is recommended to make sure that the filter driver is removed for all USB devices. To do it, you should right-click each USB device and host controller and make sure that the Remove the class filter driver and Remove the device filter driver items are not available.
Tools | Install the class filter driver - the command becomes available if a USB device, a hub or a host controller is selected in the USB devices window while no other filter driver is installed for devices and enables the filter driver for all USB devices on your system. This is how the filter driver is installed when you are installing the program and we recommend that most users use it this way. A minor disadvantage of this method is that the work of the filter driver affects (though a little bit) the work of all USB devices. After you select this command, you should restart the computer to enable the driver.
Tools | Remove the class filter driver - the command becomes available if a USB device, a hub or a host controller is selected in the USB devices window while the class filter driver is installed for devices and removes the class filter driver for all USB devices on your system. You may need this command if you want to use the filter driver separately for each USB device. After you select this command, you should restart the computer to enable the driver.
|
Note: After you install or remove the filter driver, you should restart the computer to make the changes come into effect. The Monitor window will not capture data until you restart the computer.
|
Tools | Install the device filter driver - the command becomes available if a connected USB device is selected in the list of USB devices while no filter driver of other type is installed and enables the filter driver for this USB device. If the filter driver is installed this way, its work affects only this device. The disadvantage of this method is that the driver has to be installed for each new device or in case your USB device has been connected to another USB port. After you select this command, you should reconnect the USB device to enable the driver. You can use the Tools | Replug the device fast command to avoid reconnecting the USB device manually.
Tools | Remove the device filter driver - the command becomes available if a connected USB device is selected in the list of USB devices while no filter driver of this type is installed and removes the filter driver for this USB device. After you select this command, you should reconnect the USB device to enable the driver. You can use the Tools | Replug the device fast command to avoid reconnecting the USB device manually.
|
Note: When you uninstall the program, it automatically removes all driver information (as well as the driver itself) from your system. That is why you do not need to do it manually if you want to remove our program.
|
Window menu
Window | USB devices - the command shows/hides the USB devices window.
Window | Cascade - the command cascades all child windows.
Window | Tile vertically - the command evenly tiles all child windows vertically.
Window | Tile horizontally - the command evenly tiles all child windows horizontally.
Window | Minimize all - the command minimizes all child windows.
Window | Arrange icons - the command arranges all minimized child windows in order at the bottom of the window.
Help menu
Help | Content - the command opens the table of contents of the help file.
Help | Tip of the day - the command opens the Tip of the Day dialog box that is displayed after the program is started for the first time.
Help | About - the command opens the "About" dialog box where you can see the version of the program and your registration name.
Help | Registration online - the command starts the browser using the program registration link.